Looking to create immersive MotoVlogs with stunning visuals? One crucial aspect that can take your content to the next level is using a helmet cam. And when it comes to the best options out there, GoPro is a name that needs no introduction. However, setting up a helmet cam for MotoVlogging can be a daunting task, especially if you’re new to the game. But worry not, as we have compiled the ultimate guide to help you get started and make the most out of your GoPro helmet cam. So, gear up and let’s dive into the world of MotoVlogging!
The Ultimate Guide to Setting Up a Helmet Cam for MotoVlogs Using GoPro
Introduction
MotoVloggers are taking the world by storm, capturing their rides and sharing them with millions of viewers on social media platforms such as YouTube. One crucial element of making engaging MotoVlogs is having a quality Helmet Cam setup. In this ultimate guide, we will take a look at how to set up a Helmet Cam for MotoVlogs using GoPro.
Selecting the right GoPro model
The first step in setting up a GoPro Helmet Cam is selecting the right model. Some popular options for MotoVlogging include the GoPro HERO 7 Black, HERO 8 Black, and HERO 9 Black.
Mounting the GoPro to the helmet
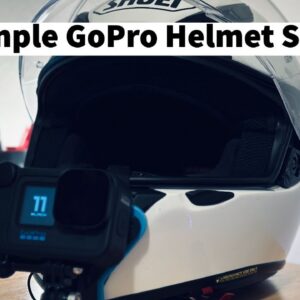
Once you have the right GoPro model, the next step is mounting it to your helmet. The most popular mounting options for MotoVlogging are the chin mount and the side mount. The chin mount is recommended as it provides a great view of the road and your motorcycle’s dashboard.
Ensuring stability
Stability is essential to making high-quality MotoVlogs. To ensure stability, the GoPro should be mounted firmly to the helmet without any wobbling. The chin mount can be secured using zip ties, industrial-strength velcro, or a 3M adhesive.
Setting up the GoPro
After mounting the GoPro to your helmet, the next step is setting it up correctly. First, ensure your GoPro has a fully charged battery and enough storage space for the length of the ride. Next, select the right settings for your MotoVlog, including resolution, frame rate, and field of view (FOV).
Shooting the MotoVlog
Once everything is set up correctly, it’s time to shoot the MotoVlog. Remember to keep your eyes on the road, obey traffic laws, and remain focused. Try to capture some unique shots, such as overhead angles and close-ups of your motorcycle.
Conclusion
Setting up a Helmet Cam for MotoVlogs using GoPro may seem like a daunting task, but with the right equipment and a little practice, it can be quickly and easily achieved. By following the steps outlined here, you can start making high-quality MotoVlogs for your audience to enjoy.
FAQs
- How can I ensure my GoPro stays secure while riding?
- Zip ties, industrial-strength velcro, or a 3M adhesive can all be used to secure the chin mount.
- Can any GoPro model be used for MotoVlogging?
- While any GoPro model can technically be used for MotoVlogging, some are better suited than others. The HERO 7 Black, HERO 8 Black, and HERO 9 Black are popular options.
- What settings should I use on my GoPro for MotoVlogging?
- The right settings depend on your preferences and conditions. Important settings to select include the resolution, frame rate, and field of view (FOV).
- How should I mount the GoPro to my helmet for best results?
- The most popular mounting options are the chin mount and the side mount. The chin mount is recommended for MotoVlogging as it provides a great view of the road and your motorcycle’s dashboard.
- What can I do to ensure stability while MotoVlogging with a GoPro?
- To ensure stability, the GoPro should be mounted firmly to the helmet without any wobbling. The use of zip ties, industrial-strength velcro, or a 3M adhesive can help keep the mount secure.


